
Posted by Lyndi
I have decided to dub my dad as “The Bella Vista Baker.” He is my baking hero.
On a recent Thursday afternoon I stopped by his house to learn how he prepares the yeast dough for artisan bread. What a treat! Less than twenty-four hours later I was back and ready to watch the loaves bake as they filled the house with that hard-to-beat incense of freshly baked bread. It does not get much better than that, right?
Just sit back and enjoy this two-part photo documentary of my father’s recipe for baking artisan bread. All the comments are his, all the photo editing is his, and I made sure I captured all his little helpful hints in the photo captions.
Please note, the basic recipe inspired by and adapted from No Need to Knead by Suzanne Dunaway.
Artisan French Baguette
Part 1: Preparing the Dough
Dad’s words of wisdom: “The great thing about this recipe is that you don’t have to be precise! The options are endless!”


MIX DRY INGREDIENTS
Dad’s words of wisdom: “Here’s the secret to this bread: Keep the mixing gentle! No violence whatsoever. No kneading, no punching down… gentle.”
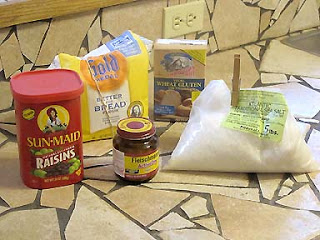
1. Measure 5 cups of bread flour.
 |
| “because of the high gluten content” |
2. 1 tablespoon Vital Wheat Gluten.
 |
| “the secret to making any bread – it’s the chewing gum that holds the gas in” |
3. 1 ½ teaspoon salt.
 |
| “when I use chicken broth as a liquid, I use less salt” |
4. ½ cup raisins.
 |
| “generally all I need, of course add as much or as little as you wish” |
5. 1 tablespoon of spice, such as Mediterranean Mix by McCormick.
 |
| “it can be any kind of spice you want: anise seed, Italian seasoning, or even open a mint tea bag! It will dissipate. Or, don’t put any spice in” |
6. Mix all dry ingredients together.
 |
| “remember, keep the mixing gentle” |
PREP LIQUID INGREDIENTS
Dad’s words of wisdom: “Now the fun part… the liquid ingredients need to be 85 degrees to 95 degrees to start off. I even start off at 100 degrees in order to make sure your yeast is about 95 degrees, human temperature, to be most efficient.”
7. Heat a pot of water and have it ready.
 |
| “my electric kettle heats water lickity-split” |
8. In a glass measuring cup, add 1 cup of sour cream.
 |
| “notice I am not being careful about measuring. It’s not exact. The other day I put in a bottle of beer instead of sour cream! Or, it can be chicken broth. Your call.” |
9. Insert your thermometer in the bowl and start adding cold and hot water (from the tea kettle) until you reach the 3 cup line. You want the thermometer to measure about 95 degrees.
 |
| “it becomes a game of hot and cold until you reach the right temperature” |
 |
| “just right” |
10. Pour 1 ½ cups into large mixing bowl.

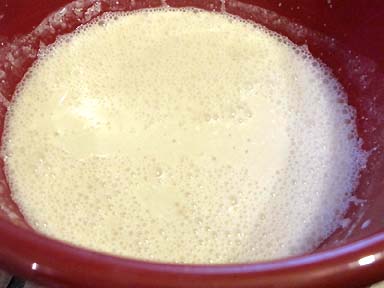
11. Add 2 tablespoons of Active Dry Yeast. Rest for a couple of minutes.
 |
| “whisk all together until yeast gets incorporated” |
MIXING TOGETHER DRY & LIQUID INGREDIENTS
12. Add 2 cups of dry ingredients into the liquid bowl.

13. Wisk together.

14. Add 1½ cups dry ingredients into liquid ingredients.

15. Mix with wooden spoon. If it is dry, add more liquid. You can tell if it’s too dry if there are dry ingredients on the bottom of the bowl.
 |
| “it smells so good at this point” |
16. Dad’s words of wisdom: “Continue adding dry ingredients to the liquid and keep mixing with wooden spoon. The trick is to keep it moist, but not too much moisture or the thing may collapse. This type of bread has to be wet and I’ve found that 3 cups of liquid to the dry ingredients does the job, perfectly. If there isn’t enough liquid, when you form the loaves they just won’t rise fully.”

17. It is now moist, wet, shiny and oozing off the spoon.
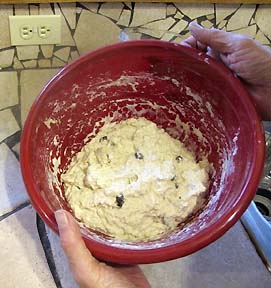 |
| “typical bread dough recipes do not normally do that… but this is what we want!” |
18. Cover bowl.


19. Put in Refrigerator for 12-18 hours. That is why this recipe is called artisan. The slower the yeast rises, the better the flavor!
 |
| “I normally make the dough around 10pm, take it out at 5am the next morning and let it sit on countertop (2 hours) until it is ready to go at 7am” |
And this is where we, too, will rest for 12-18 hours. What do you think so far?
Come back tomorrow when we will learn about Part 2 of Artisan Bread…The Finished Product.


Hey, this is a great post! I hope there will be more like this on your blog. I'm off to read the next part.
I'm not sure if I will make it with the raisins or not…can I use chocolate chips instead 🙂
StaC
Of course!!! Chocolate chips would be great… maybe not with chicken soup as the liquid, of course. 🙂