• HOME
  • happy living
    • meal planning + prep
    • kitchen basics
    • hospitality
    • foodie finds
    • live happily
  • simple eats
    • appetizer recipe
    • beef recipe
    • chicken recipe
    • dessert recipe
    • drink recipe
    • fish recipe
    • lamb recipe
    • salad recipe
    • soup recipe
    • starch recipe
    • vegetable recipe
    • Pressure Cook recipe
    • Slow Cook recipe
  • NWAFOODIE
  • SHOP
  • About
    • Privacy Policy
  • CONTACT
Simple Joyful Food

encourager of simple eats + happy living

starch recipe

Artisan French Baguette Part 2: The Finished Product

February 4, 2011 4 Comments

Posted by Lyndi
Today we continue with the finale of my dad (“the Bella Vista Baker”) making artisan bread.  Click here for Part 1, in case you missed it!
Dad’s words of wisdom:  “Remember, the slower and longer the yeast rises, the better the flavor!”
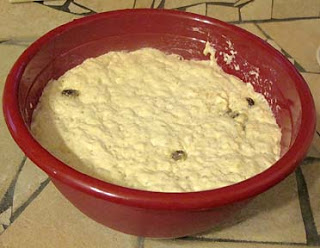
Take the dough out of fridge two hours before you begin this phase. 
“you want to bring the dough up to room temperature”
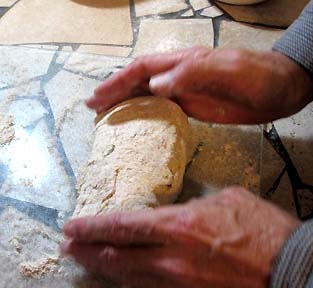
FORMING THE BAGUETTE
1. Lightly flour the cutting board surface. 
“in our case, we’ll need extra because our dough is on the wet side”
2. Roll dough gently on cutting board surface. 
“DO NOT KNEAD, POUND, OR PUNCH DOWN!”
3. Gently form the dough.  
4. Cut dough in half for two normal-sized baguettes. 
“I like small loaves, so I cut in four”
5. Take each one and gently form into a cylindar shape.  
“be gentle”
6. Cover with a towel and let it sit for 15 minutes. 
“it relaxes the gluten when it sits, so it’s not tough”
7.  Spray baguette pan with PAM spray.  
8. Flour cutting board and roll baguettes in flour. 
“Be really gentle with it.  If I find a raisin that sticks out,
I push it back in so it doesn’t burn into a hard crisp when baking”
9. Place in baguette pan. 
“Because this is a wet dough, the raisins pick up
all the water so they stay big, fat, and plump.”
10. Cover with towel again.  
“To keep “skin” from getting hard”
11. Let rest for 30 minutes.  It will rise a little bit more during this time.
12. Turn on oven and pre-heat to 450 degrees.
BAKING THE BREAD
Dad’s words of wisdom:  “This bread has “oven spring” meaning when you put it in the oven, it rises about 25%.  The moisture suddenly expands.  It is not a rising of the yeast, it is the steam inside because it is so dense.  The danger is that if it is too wet, the bread may split.  Which only means it won’t look pretty.”
13. Set digital thermometer to 190 degrees and timer to15 minutes
14.  Remove towel.  


15. Turn on the hot water again
16.  Gently brush room temperature water (with a soft brush) on the tops of the bread dough.   

“it helps it to get firmer.  Do it GENTLY.”
17. Sprinkle carraway seeds, seseme seeds, or any kind of seed you want on top!  
“options are endless, sometimes I use rolled oats or lemon zest”
18.  Cut diagonals GENTLY on top of bread about ½ inch deep. 
“If dough is too wet, you may “lose” your cuts”
19. Put bread in oven. 
20. Put shallow pan in oven … not a dark or non-stick pan, on the side of the oven away from the oven light. Pour 1 cup of boiling water into the pan.  

“This will produce steam and the crust will get hard.
Be careful of your face, and don’t get any
water on the oven light or it will break.”
 
21. Lower oven temperature to 400 degrees.   
22. Turn on timer and set to 15 minutes.
23. Clean up, throw away any flour you have left.
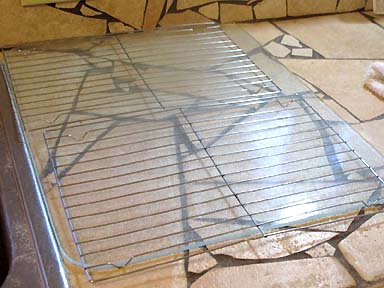
24. Set up cooling racks.
25. When temperature beeps, open oven and rotate pan.
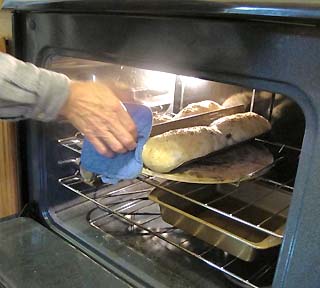
26. Insert digital thermometer into middle of thickest loaf, leave in until it beeps (when internal temperature is 190 degrees.   
“takes a couple of minutes”
27. Turn off oven, leave bread in the oven until thermometer reaches 200 degrees.
28. Remove bread from oven, place on cooling racks for 5 minutes.
29. Remove baguettes from pan and leave on cooling racks until they are cool to the touch. Takes about 1 ½ to 2 hours. 
“you can’t cut the bread when it’s hot”
30. And the fun part… EAT!  
“I will wrap and freeze 3 of loaves but it must be absolutely cool before you wrap!”
And there you have it.  Step by step instructions on how to make your very own Artisan Bread. 
Oh, I didn’t say it would be easy.  You won’t catch me making it anytime soon.
But it was worth the time watching my dad bake, right?  And it was worth my time spending it with him.  Besides, half the fun of reading blogs is looking at the pictures, right?
Thanks Dad!  I love you!

You might also like...

A horseradish-crusted beef tenderloin that is tasty, tempting, and tantalizing. The Bella Vista Baker: Artisan Bread Making, Part 1 Make French Onion Soup and awaken your senses.

Share

Share
Tweet
Email
Pin
Comment
Previous
Next

Comments Cancel reply

Your email address will not be published. Required fields are marked *

Recipe Rating


  1. cmricha2 says

    February 4, 2011 at 8:18 pm

    Did Dad share? I bet your co-workers would really like to taste Dad's masterpiece 😉

    Reply
  2. nwafoodie says

    February 4, 2011 at 9:06 pm

    You make an excellent point. Let's just see what I am able to pull off!

    Reply
  3. Meigan says

    February 27, 2011 at 1:49 pm

    You are really making me want to start baking my own bread. And no way do I have time for another project! But wow – does that look awesome.

    Reply
  4. nwafoodie says

    February 27, 2011 at 11:30 pm

    Meigan, it's decided. You've got to put this on your project to-do list. It's now a priority.

    🙂

    Reply

hellooooo!

author image of thejoyofeatingwell blogHi, friend.

My name is Lyndi Fultz and I live in Northwest Arkansas in the beautiful Ozarks.

In this blog you’ll learn how to make simple and healthy meals. I also share the benefits of finding the joy in everyday living.

Read more…

SJF social links

  • Facebook
  • Instagram
  • LinkedIn
  • Pinterest
  • Twitter
  • YouTube

Newsletter signup

Please wait...

Thank you for signing up!

search categories

Search by Year

TRENDING POSTS

FOLLOW ON INSTAGRAM

simplejoyfulfood

a journal of simple living + healthy eats
+ @nwafoodie
blog links 👇

Lyndi Fultz
Have we chatted about Azure Standard yet? Once a m Have we chatted about Azure Standard yet? Once a month they do a drop in my neighborhood and I always look forward to the bounty of foods and household goods. My order may be small but I love joining in with everyone else to unload the truck! You may have a drop in your neighborhood. If you’re curious, I can tell you more!
Thankful for my past self for preserving summer's Thankful for my past self for preserving summer's herbs. 🤩
This was a big "oops" moment. As I pulled out my t This was a big "oops" moment. As I pulled out my tub with all my handmade serving bowls (and one lovely @lecreuset dish), they all came crashing to the floor.⁠
⁠
Crash!⁠
Smash!⁠
Shock.⁠
⁠
Honestly, I was happy I used them all the time, and they had a good run.⁠

I learned long time ago to use what you have. Otherwise, why have it?
The feeling after you ate too much. The feeling after you ate too much.
Ad. Oh, hi there. You’re pretty busy right now, Ad. Oh, hi there. You’re pretty busy right now, aren’t you? Okay, I will make this brief. ⁠
⁠
Print, bookmark, or pin this Easy Cheesy Roasted Garlic Chicken Skillet Slider recipe. Better yet, make it for dinner!⁠
⁠
You know I’m all about being helpful. And healthy! I’ve also been afraid to walk down that frozen or prepared foods aisle at the store, thinking, “Nope, not for me. They’re not healthy.” ⁠
⁠
I feel good about @kevins.natural.foods because I know I can still eat well by keeping them on hand, whether for the four-o-clock pinch or meal planning.⁠
⁠
I first tried Kevin’s Cauliflower Mac n Cheese when it was a special buy at Aldi’s. The ingredients were simple and pure, and we were delighted to discover they tasted great!⁠
⁠
Kevin’s also has a line of delicious five-minute entrees like Peppercorn Steak, Cilantro Lime Chicken, and Roasted Garlic Chicken.⁠
⁠
My recipe for Easy Cheesy Roasted Garlic Chicken Skillet Sliders only has seven ingredients and seven steps. Best of all, you can complete it from skillet to table in ten minutes!⁠
⁠
Recipe link in bio!⁠
⁠
#kevinsrecipechallenge⁠
Ad. Quick – what is the first food that comes to Ad. Quick – what is the first food that comes to mind when you think of Thanksgiving dinner?⁠
⁠
Turkey?⁠
⁠
Green bean casserole?⁠
⁠
Mashed potatoes?⁠
⁠
Sweet potato casserole?⁠
⁠
Corn?⁠
⁠
Peas?⁠
⁠
Gravy?⁠
⁠
The correct answer is all of them! But mostly, you can’t have Thanksgiving without turkey, sweet potatoes, and veggies. It’s un-American.⁠
⁠
This crazy-awesome pie is stuffed with an abundance of shredded turkey, sweet potatoes, corn, peas, and gravy – Ding! Ding! Ding! – You guessed correctly! It also has ooey-gooey cheese and sour cream to add a layer of comforting delight.⁠
⁠
Link in bio for my Thanksgiving-inspired pot pie that uses three @wickspies 8″ raw circles. One for the base and two to cut lattice strips (using a ravioli cutter) so that it looks extra pretty. Of course, you could just use two raw circles. One for the base and one for the top. Just cut some slits on the top crust so that some ooey-gooey delightfulness can do its thang.⁠
⁠
#WicksPies #TrustTheCrust #InCrustWeTrust #thanksgiving #potpies #simplefood #easyrecipes #thanksgivingrecipe
Load More... Instagram

contact

lyndi@thejoyofeatingwell.com

inspiration

“Just like becoming an expert in wine–you learn by drinking it, the best you can afford–you learn about great food by finding the best there is, whether simply or luxurious. Then you savor it, analyze it, and discuss it with your companions, and you compare it with other experiences.” – Julia Child

Copyright 2023 thejoyofeatingwell