I want to change lives. I believe that it starts simply with learning how to clean and organize your fridge.
With just a little bit of planning, you will have delicious and healthy foods at your fingertips. In case you are skeptical, don’t worry. You don’t have to be a “super planner” or a “Type A” person to be a meal planner or learn to eat well.
It just takes a little confidence builder that starts with cleaning and organizing your fridge.
A clean fridge gives you an idea of what you have available and what needs to be consumed before it is wasted.
An organized fridge helps you stay on top of it and frankly… I like to add a little bit of décor simply to make opening that door a delight.
Let’s get started!

Here are 20 ways to clean and organize your fridge.
- Take everything out.
- Take a note from the #KonMari method and take everything out. Everything!
- Group like items together.
- yes, if you have something that doesn’t “spark joy” – get rid of it! If that impulse purchase of dill-flavored ketchup isn’t rocking your boat, bye-bye.
- Toss out expired foods.
- Check expiration dates and toss out anything that is expired or questionable.
- Be sure to open lids and double-check because sometimes cross-contamination does nasty things to your foods.
- Think 1-2-3 as you scan all your removed items.
- 1= keep
- 2=maybe keep
- 3=never use.
- Toss your 3s. Your 2s are the ones you are going to “shop” this week and start incorporating into dinner or lunch recipes. If you aren’t motivated to use your 2s, then get honest with yourself and call it a 3. Life’s too short to lose valuable fridge real estate to 3s!
- Clean those shelves thoroughly from top to bottom.
- Yes, you can get fancy with all types of specialty cleaners or vinegar but nothing beats sudsy dish soap and water.
- See-through mason jars are your best friend.
- Rethink your family’s frequently used ingredients and put them in see-through mason jars for beautiful inspiration.
- Grated parmesan cheese is a must for mason jars.
- Take a hard look at your most frequently used ingredients.
- This may be feta cheese, plain yogurt, blue cheese, and salsa.
- Put them all in mason jars with a pretty lid.
- Anything that you use often and can immediately tell what it is by simply looking at it, in a jar it goes.
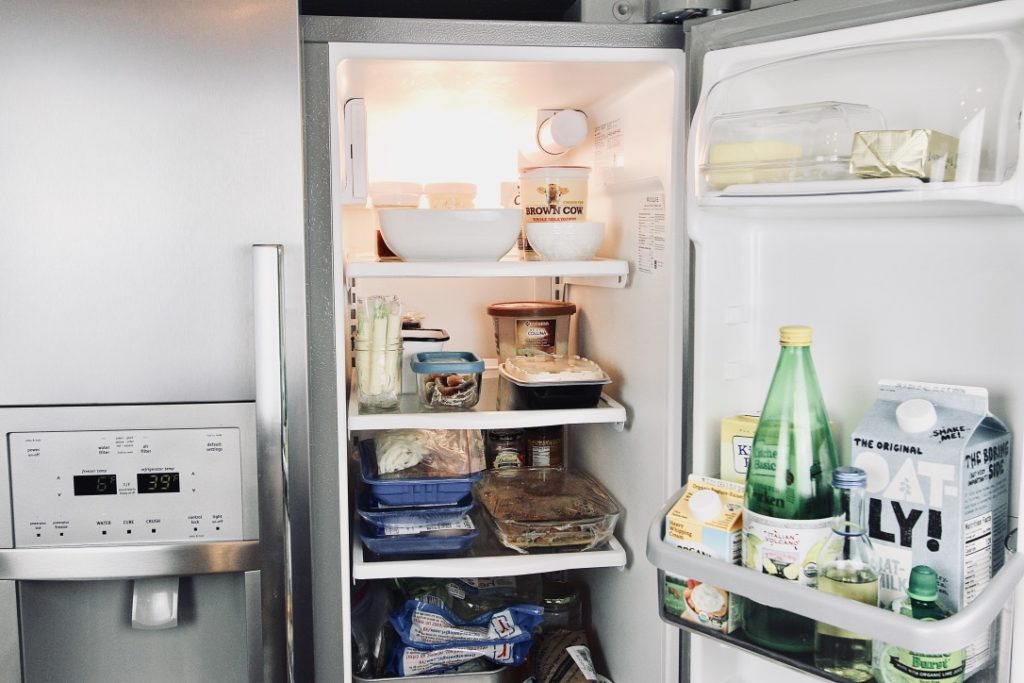
- I like to group my dairy-type items on the top shelves and believe me, it gives me a joyful lift whenever I open the fridge door.
- Store your eggs in a pretty bowl.
- This is one of my favorite fridge décor tips: find a beautiful low-profile bowl to store your eggs.
- There is something quite inspiring to have an overflowing bowl of eggs (seriously, the best ingredient in the world) that is literally begging you to reach in and cook.
- Take off the label of products in glass jars.
- That’s right, especially those that are easily recognizable and not in danger of expiring.
- Think salsa jars, olive jars, and pickles.
- Replace your Mason Jar lids.
- Order beautiful mason jar lids to replace the disposable lids that they came in.
- Let’s face it, not all of into canning so we can skip the refills and purchase beautiful lids that we can use over and over again. Amazon, Walmart, and Target can hook you up.
- Replace your butter tray.
- Find something cute so that each time you butter your bread or sauté, it makes you happy.
- Stock up on meal prep containers.
- Doing this will ensure that you have snacks ready-to-go and consume.
- Good for leftovers, too.
- These can be mason jars, Bpa-free plastic containers (Sam’s Club can hook you up), or pretty little artisan bowls to store fruits, avocados, or string cheese.
- Keep fresh fruits and quick snacks within easy reach.
- Why? So you’re not tempted to go to the pantry and eat those processed snacks.
- Which reminds me, why are you even buying processed snacks?
- The more you keep healthy foods stocks and ready to eat, the easier it is to eat them!
- Take stock of your cheeses in your cheese drawer.
- Don’t throw away those hardened cheeses where air got to them.
- Combine them all in a special glass container and the next time you make soup, drop them at the end and you’ll get a delicious salty dimension.
- Take a hard look at those vegetables.
- Are they starting to turn?
- Are there any that are salvageable?
- Even if it is one mushroom here and a stalk of celery there… now is the time to use them up before you throw them away and compost them.
- I call it “Reset Soup” where all the veggies go in a pot with a little broth and a little cream and then a quick swirl of the immersion blender and ! You have a delicious soup with tons of nutrients and that resets your body with a boost of healthy!
- Start phasing out vegetables.
- Consider the season you are in right now and start phasing out the vegetables that are too light or too heavy for the season.
- For instance, if your crisper is stocked full of acorn squash or Brussel sprouts, use these up first or prep them for the freezer.
- Invest in vegetable bags.
- Not only will they keep your vegetables fresher longer than a suffocating plastic bag, but they will also look pretty.
- Pretty can be inspirational as you open the fridge door or crisper door.
- In this case, vegetable bags that are uniform are way to display what you have while them fresher, longer.
- Repurpose one of your crisper drawers.
- Who says that you need two vegetable drawers or two dairy drawers?
- One of my favorite things to do is to dedicate one of my crisper drawers as a condiment drawer.
- Do you know all those little pesto jars, anchovies, olive paste, and minced garlic jars?
- You only use these once in a while and you’ve determined they are your 1s, your keepers.
- So, tuck them away so they can live together and not clutter up your shelves.
- Rethink your fridge door.
- Who says you have to keep it full of juices, ketchup, and mustard?
- Why not make it useable and beautiful with jars of snacks and nibbles?
- Create staging areas with your shelves.
- For me, that means my top shelf is all things dairy and well, white-colored objects that are used often for breakfast: eggs, yogurt, sour cream, and jars of cheese.
- My second shelf is for snack foods and foods that are ready to be consumed.
- The next shelf is for upcoming meals that need to be reheated.
- The bottom shelf is my “what’s up next” shelf where I keep meat that is thawing from the freezer, or something I want to use in a meal within the next day or two.
- For the “thawing out” station I keep a cute antique roasting pan to store those items. This keeps any moisture from accumulating on the shelf itself and it’s a nice reminder of what’s coming up next.
- Now is the time to replace filters.
- Doing this will ensure that you won’t have to address any cooling issues that can be remedied by turning up or down the temperature.
- Be sure to research your fridge’s model for specifics.
I hope you found these twenty steps useful and actionable.
Which step intrigued you the most?
Eat well, my friends.
Lyndi


